Access the scripts you use every day from the macOS menu bar
Latest Release: 2.1.0
New Version
Download And Install MNU
You can install MNU on macOS using Brew. In Terminal, just run:
brew tap smittytone/homebrew-smittytone
brew install --cask mnu
Alternatively, click the file link below to download the macOS version of MNU.
Linux versions, where available, must be built from source.
Please verify the integrity of the download with the SHA-256 checksum.
| File Name | mnu_2_1_0.dmg |
|---|---|
| File Size | 1.2MB |
About MNU
MNU is a macOS main menu bar utility which provides not only a number of handy controls for system settings you may change frequently, but also allows you to invoke shell scripts that you use often.
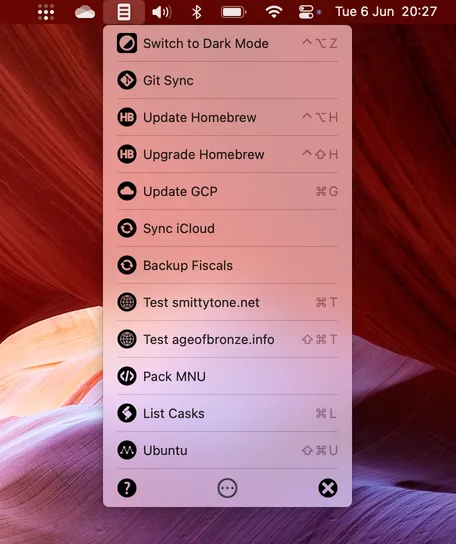
MNU comes pre-configured with these useful items:
- A switch to enable or disable macOS’s Dark Mode (Mojave and up).
- A switch to show or hide files on the Desktop.
- A switch to show or hide hidden files.
- A trigger to update your Git repos (requires gitup).
- A trigger to update your Homebrew installation (
brew update). - A trigger to upgrade your Homebrew installation (
brew upgrade). - Display your Mac’s IP address in the terminal.
- Display your main drive’s free space in the terminal.
- Screengrab a Finder window.
- Any or all of these stock items can be hidden from view if you don’t need them; you can add your own items; and you can re-order the items.
Terminal Selection
MNU supports not only macOS’ own Terminal app but also popular third-party terminal app iTerm2. You can select the terminal you’d like MNU to use by opening the Configure MNU window and going to its Preferences tab and making your choice. Please note that if you don’t have iTerm2 installed, or it is installed in a non-standard location, MNU will revert to Terminal.
Support for further third-party terminal apps will be considered if there is sufficient demand from users.
How to Use MNU
The first time you run MNU, it will ask you whether you want it to start automatically the next time you log into your Mac. We recommend that you click Yes, but you can always start MNU manually by double-clicking on its icon. If you click No and subsequently change your mind, you can tell MNU to start automatically by setting the appropriate preference.
If you click Yes when you see the start automatically request or when you first use one of MNU’s items, macOS will request permission to grant MNU the right to access System Events. Please OK this request. macOS will also ask you to grant MNU permission to access Terminal. Again, please OK this request.
Important MNU will not fully function without permissions to access “System Events”. Please grant this permission when your Mac asks you.
You can always check the permissions granted to MNU by opening System Preferences > Security & Privacy > Privacy > Automation:
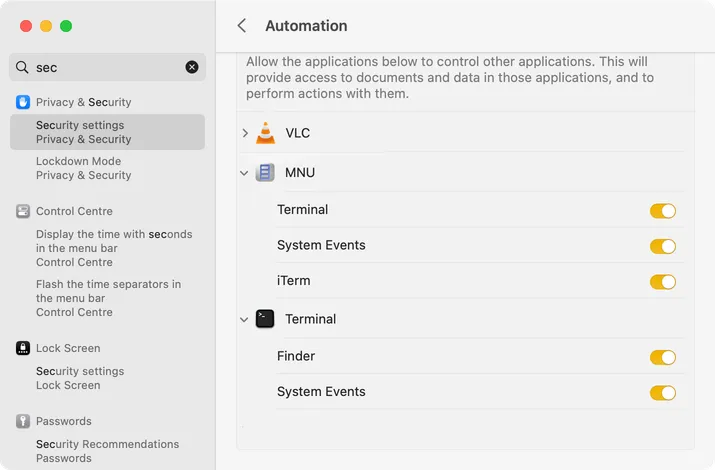
If you change the terminal app MNU works with, you will need to re-confirm your permission.
Note MNU’s installer (though not the version available through Homebrew) will restart a new version of MNU if it is already installed and currently running.
How To Configure MNU
To configure MNU, click on the action icon in the centre of the last item on the menu:

MNU’s controls (left to right): Help, Configure and Quit
This pops up the Configure MNU window: make sure the Menu Items tab is showing:
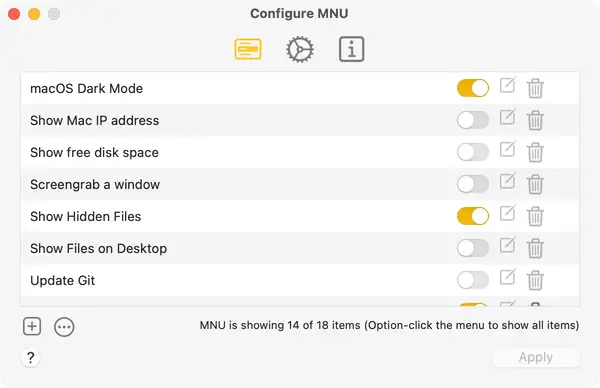
The Menu Items tab lists the menu items currently set up for MNU in the order in which they appear in MNU. You can reorder the items just by grabbing one item and dragging it to the location you prefer. When you’re done, click Apply to update MNU, or close the window to ignore any changes you have made.
All of the menu items feature a button which allow you to hide any such items that you don’t need. The button is green is its item is shown in the menu, or red if it is not. Just click the button to hide any shown item. If you later decide you’d like to see a hidden item after all, just click the button (now coloured red) to bring its item back to MNU.
Hint option-click MNU’s menu bar icon to temporarily view the complete menu, including hidden items.
The other buttons, which are disabled for pre-installed items, allow you to edit or delete items you have added yourself:

MNU’s item controls (left to right): Show/hide, Edit and Delete
How to Add and Edit Your Own Menu Items
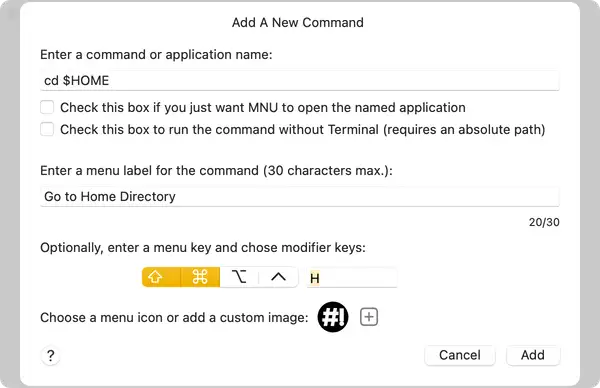
Initially, MNU contains only the built-in items, but you can add further ones by clicking + in the Configure MNU window. This presents a sheet in which you can enter a terminal command that can then be invoked from MNU’s main menu. The command can be a basic request to change directory (for example, cd $HOME), or can be a complex command line sequence that invokes a script or command and passes in fixed arguments (such as, ~/scripts/myimageresizescript.py -size 640 480):
You can include quoting in terminal commands, with escaping for double-quotes (\"), the dollar sign (\$) and the tick (`). For example, the commands
echo "You \`ave `ls | wc -l` files in `pwd`"
echo "The value of \$HOME is $HOME"
echo "$GIT"
will be correctly executed in the terminal. Please note that this does not apply to commands run without a terminal, ie. outside of a shell.
When creating a new MNU item, you will also need to give the command a name by which it will be listed in the MNU menu. This should not match the name of an existing item.
If you wish type a key and choose one of the optional modifier keys. When MNU is open, hitting that key will trigger the menu item.
Lastly, click on on the circular Menu icon to change the image which will appear alongside the item in the menu:
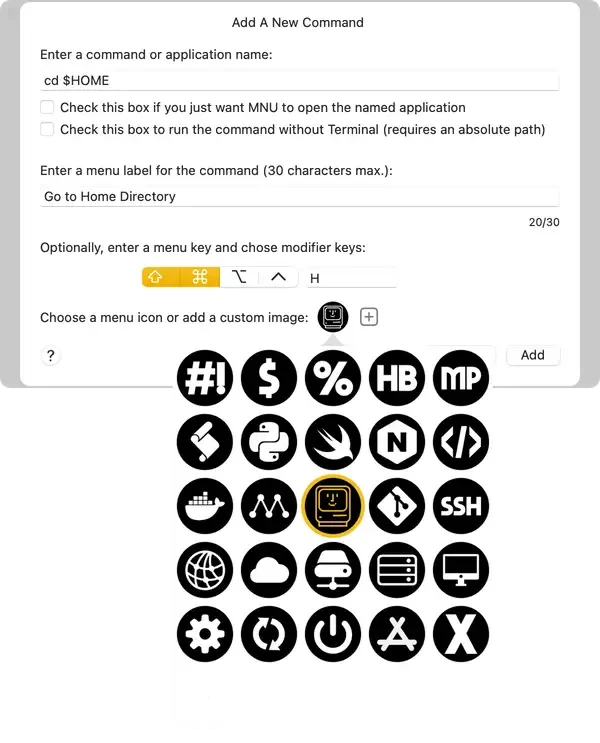
Click on a new icon to select it, then click off the popup panel to hide it. When you are done, click Add, or Cancel to discard your changes.
The new item will now be listed in the Configure MNU window’s Menu Items tab, but it won’t be added to MNU until you click Apply; closing the window will cause the new item to be discarded.
Items you have added can be deleted from the list, or they can be edited if you need to make a change: just click on the delete or edit buttons, respectively.
When MNU quits — you have restarted or shutdown your Mac, or you have clicked the quit icon at the bottom of the menu — it saves the current state of the menu so it’s ready for next time.
Adding a Custom Icon
To add a custom menu icon to your new entry, click the + button alongside the pre-selected icon (or the icon you have selected). This will allow you to find and select a suitable image file. Images should be in Apple’s template image format: in other words, an image format, such as .png that supports transparency and in which image pixels are solid black, or black plus a degree of opacity.
Choosing a suitable image automatically selects it as your menu item’s icon, and makes it available to be chosen for other menu items too. MNU keeps a copy of icons you apply.
Opening Applications
MNU also allows you to name macOS applications that can then be activated from the menu bar. Add a new item as outlined above, but this time enter the name of the app and tick the Check this box if you just want MNU to open the named application checkbox:
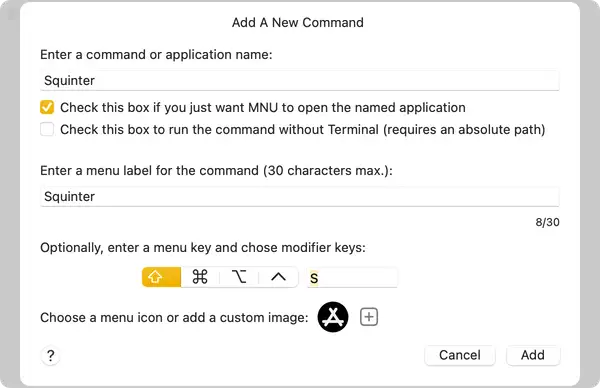
Click Add and then Apply. When you select the application from MNU, it will be opened without first opening the macOS Terminal.
Don’t provide a path: MNU will do this for you. If you wish to specify a path, uncheck Check this box if you just want MNU to open the named application.
MNU will check that the application exists in standard macOS application directories:
/Applications/Applications/Utilities/System/Applications/System/Applications/Utilities~/Applications
Again, if you want to open an app outside of these locations, use the open command, specify the path to the app and uncheck Check this box if you just want MNU to open the named application.
Running Scripts Outside of a Terminal
MNU lets you to add commands that can be run without a terminal or a shell, ie. directly under the operating system. Add a new item as outlined above, but this time enter the command and tick the Check this box to run the script without a terminal checkbox:
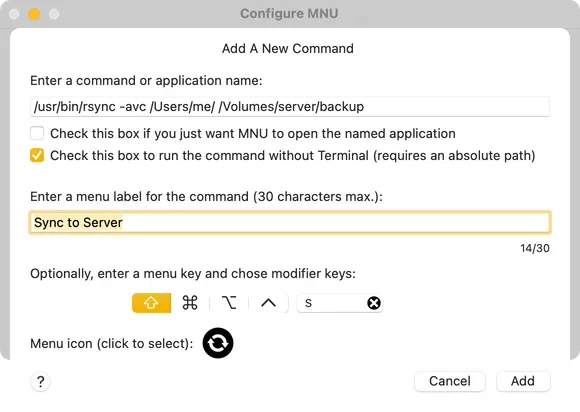
Click Add and then Apply. When you select the item from MNU, it will be executed without opening a terminal.
It’s important to remember that, without a terminal and without a shell, commands run this way must be provided with a full path and must not use shell variables, eg. $HOME. Items called directly will not undergo any substitution or quoting. For example, the command rsync -avz ~ /Volumes/server/home will silently fail: ~ is not a valid path outside of a shell and rsync is not in the root directory. Instead use /usr/bin/rsync -avz /Users/a_user /Volumes/server/home.
MNU will warn you if you include characters likely to be relevant to a shell or likely to expect shell substitution.
You should also remember that you can’t call shell scripts this way.
MNU will not check that the tool you are calling exists, so if you provide an incorrect path, the call will fail silently.
MNU determines the calls arguments by looking for spaces in the command you enter. If you need to include a space within an argument — for example, within the path to a file like /Users/user/Documents/Special Effects/cgi — you can prevent MNU breaking the argument into by escaping the space: /Users/user/Documents/Special\ Effects/cgi. This is available in MNU 1.6.0 and up.
How to Backup and Restore Your Menu Items
You can export a record of the items presented by MNU by clicking the gearwheel button then selecting the Backup MNU Items. option. This will present a dialog in which you choose the location of the record.
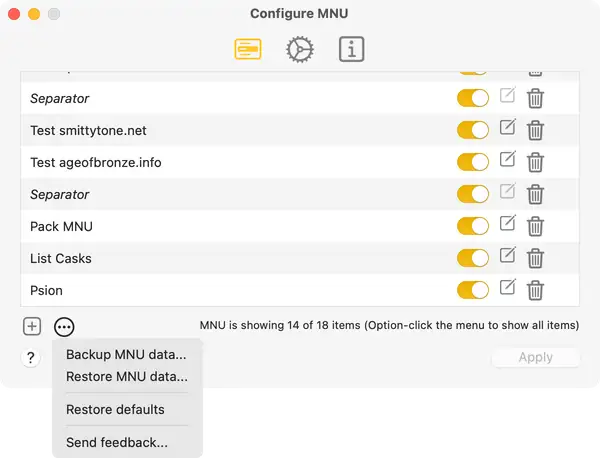
Loading in a saved list of items is just a matter of clicking the gearwheel button, selecting the Import Items. option and locating the record file when prompted. This action will replace all of the items listed in the Menu Items tab, but the menu itself will not be updated (and the new items saved for next time) until you click Apply. If you just close the Configure MNU window, the imported items will be ignored (though the backup list can be imported again at another time).
You might use this feature for backup purposes, or to synchronise menu items across multiple Macs. Because menu items can be set to trigger scripts that may download and run software on your Mac, only import menu item files you trust.
Restore MNU’s Defaults
Use the same menu described above to bring MNU back into its out-of-the-box state.
Delete Unused Custom Icons
Use the same menu described above to remove stored custom images that you no longer require. This only clears the image from MNU’s cache, not the original image.
MNU Preferences
The second tab in the Configure MNU window shows MNU’s preferences:

Currently there are:
- Choose between macOS’ Terminal and iTerm2 as your preferred terminal. MNU 1.6.0 and up.
- The option to start MNU automatically when you log into your Mac.
- The option to run Terminal commands in a new tab.
- The option to show item images in MNU’s menu.
The first of these will initially be set only if you asked MNU to start automatically when MNU gave you this choice on its first run. Checking or un-checking this preference will, respectively, cause MNU to be added to or removed from System Preferences’ Users & Groups > Login Items readout:
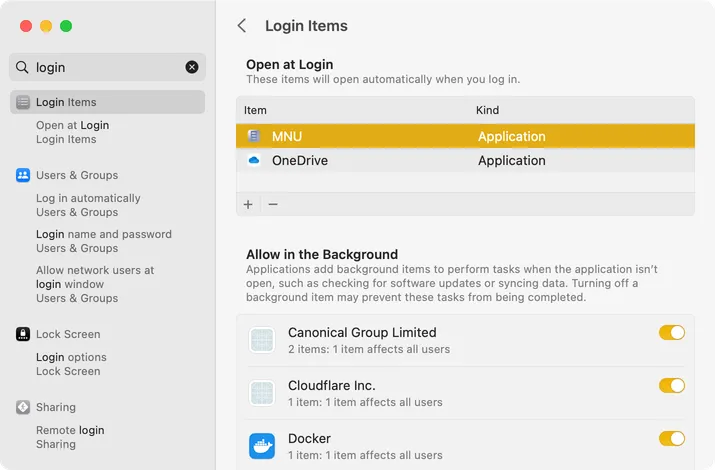
We recommend you enable this option so that MNU is always present in your mac’s menu bar when you need it.
Running Terminal commands in a new tab will always ensure MNU doesn’t affect any Terminal tabs you already have open and in which you may be already running a command. If this option is not checked, MNU will always run commands in Terminal’s first tab, whether it is already running a command or not.
MNU presents images to help you identify menu items quickly, including a generic icon for items you have added yourself. If you don’t want MNU to include these images, un-check this option.
By default, MNU will send terminal commands to macOS‘ Terminal app. However, if you’re an iTerm2 user, you can tell MNU to use this terminal app instead of Terminal. If you choose iTerm2 but don’t have it installed, or it is installed in a non-standard location, MNU will revert to using Terminal.
The Configure MNU window’s last tab provides some information about MNU:
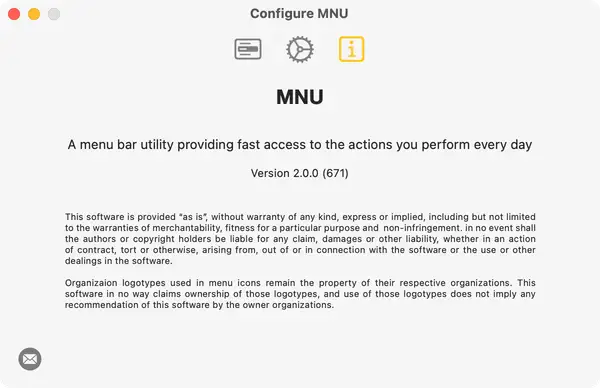
Please click the envelope icon to report any problems you encounter with MNU, or to make suggestions for future functionality. We can’t respond to every feedback message we receive, but we will make a note of all bugs reported and any comments that you have to make about the app.
Source Code
You can view MNU’s source code at GitHub.
Release Notes
- 2.1.0 11 December 2025
- Support macOS 26 Tahoe.
- Add Configuration panel extras menu item to remove unused custom icons from the store.
- Add an accessory view to the custom image selection panel to indicated supported image file types and useful image information.
- Improve custom menu icon image-handling code.
- 2.0.0 2 May 2025
- Updated configuration UI.
- Allows you to add separators to the menu list, or choose to have separators placed automatically to replicate the look of MNU 1.x.
- Allows you to add custom icon images.
- Allows you to view output from direct commands (experimental).
- Allows MNU to be restored to its default settings.
- End support for macOS 10.x: 11.0 (BigSur, 2020) is the new minium supported version.
- 1.7.1 30 April 2024
- Clarify which code you must supply to build the app.
- Fix some typos.
- Automate build number incrementation.
- No functional changes.
- 1.7.0 20 June 2023
- Add key equiavalents with modifiers to menu items.
- Replace the item show/hide gree/red dots with switches so…
- …end support for macOS 10.14: 10.15 (Catalina, 2019) is the new minimum supported version.
- Better Configure MNU item action icons.
- Internal improvements.
- Fix crash on clicking any help button.
- Fix feedback system.
- 1.6.3 8 May 2022
- Correct Help URL.
- 1.6.2 5 October 2021
- Fix old, unchanged dates.
- 1.6.1 23 July 2021
- Call external processes, eg. Terminal, from a secondary thread.
- Attempt to fix issue in which changes to a menu item’s code are not registered.
- 1.6.0 6 June 2021
- Added support for iTerm.
- Additional default items.
- Improved handling of spaces in direct commands’ path arguments.
- Improved escape character handling.
- Improved script and script title field presentation when editing a script.
- 1.5.2 19 May 2021
- Correctly record the preference for starting MNU automatically at login.
- Fix start up crash on systems that record binary values in Finder and GlobalDomain preferences in a different way to mine, eg.
1vsYES(thanks to @jgoldhammer)
- 1.5.1 28 April 2021
- Support the ARM Mac Homebrew standard install location,
/opt/homebrew/. - Refactor some feedback system code.
- Support the ARM Mac Homebrew standard install location,
- 1.5.0 1 February 2021
- Support all macOS app locations for ‘open app‘ actions:
/Applications,/Applications/Utilities,/System/Applications,/System/Applications/Utilitiesand~/Applications. - Correctly update the Configure Window’s view of the menu contents.
- Make sure mutually exclusive menu item actions can’t be selected together.
- Make sure out-of-terminal commands use absolute paths, and in-path relative elements are evaluated.
- Warn user when commands used by default items are not installed.
- Support all macOS app locations for ‘open app‘ actions:
- 1.4.6 9 December 2020
- Fix scrunched Configure MNU menu items table.
- 1.4.5 2 December 2020
- Minor icon tweak, no code changes.
- 1.4.4 30 November 2020
- Big Sur UI fixes: table rendering oddness and control spacing oddness.
- 1.4.3 17 November 2020
- Apple Silicon support.
- 1.4.2 23 October 2020
- Packaging update.
- 1.4.1 Not Released
- Minor improvements.
- 1.4.0 21 February 2020
- Support for macOS 11.0 Big Sur.
- Preliminary Apple Silicon support.
- 1.3.0 6 August 2020
- Preliminary support for quoting and escaping in Terminal commands.
- Updated selection of menu item icon graphics. If you’re upgrading from an earlier version, some of your icons may change. Please just edit the item to select a different icon.
- Better recovery when the persisted MNU item list is damaged. The user is now asked how they want to proceed: quit the app or start with the default items.
- Better serialization and de-serialization.
- Update code to avoid deprecated calls.
- Add unit tests.
- 1.2.2 9 June 2020
- Add the ability to execute commands outside of a shell/Terminal.
- 1.2.1 4 February 2020
- Add copy, cut, paste, select all, undo and redo to the Add/Edit User Item text fields.
- 1.2.0 14 January 2020
- Add app opening.
- 1.1.1 20 November 2019
- Add app restart installer scripts.
- 1.1.0 28 October 2019
- Add an extra controls button to the Configure window. Allows export and import of a JSON representation of the current menu item lits for backup and/or sync across Macs.
- Add tooltips to key UI items.
- 1.0.1 9 October 2019
- Minor improvements.
- Show correct version in MNU menu bar tooltip.
- 1.0.0 17 September 2019
- Initial public release.
